

Design
Here at Shaggy Designs we are interested in making the best possible boat, and that includes both the right shape, and also the materials that go into making the boat. If you have ever looked at a boat and thought to yourself - How do they do that? - then hopefully this page will offer some insight into the design process. We have condensed a process that takes months or sometimes years, into a step by step guide to how we design a boat. We have had to leave a lot out, such as some of the pitfalls and shortcuts that we have encountered along the way. We make all of our boats out of high tech composite materials rather than plastic because we think that it offers lots of advantages. To learn more, take a look at our Materials page.
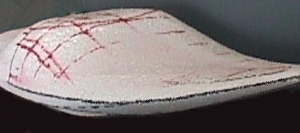
1. Model the concept
We usually start with an idea in our heads that we argue about a lot, scribble on the back of envelopes and make lots of foam models. A model allows us to effectively communicate 3D ideas, and to see if a design looks 'right' without building full size. However, the finished boats hardly ever seem to look exactly like any of our models....
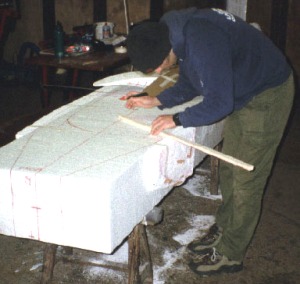
2. Scale up to full size
Once we have a satisfactory model, we then mark on a measurement grid, and scale up the dimensions to life size. These measurements are used to mark out foam blanks to be cut and glued to the shape of the life size boat. These will eventually form the inside of the plug.
3. Cut and shape the foam
The foam blocks are shaped, first by cutting away much of the excess foam, and then sanding to the desired shape. Great care must be taken to make sure that the foam is symmetrical, and features such as the hull release edges are uniform. This is done using specially shaped sanding pads and templates.

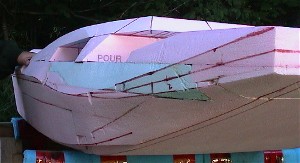
4. Cover the foam
A layer of fibreglass is put over the foam to form the rigid skin of the plug. This protects the foam shape from damage and gives a smoother surface after the fibreglass has been sanded.
5. Fill, sand and polish the plug
Once the texture of the fibreglass has been sanded, layers of filler pastes are applied to the plug. The last layer of fine filler is able to take a wax polish, which is used as an aid in releasing the prototypes and mould from the plug. The surface finish of the plug is important because it determines the finish of the final boats.

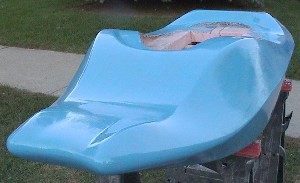
6. Laminate a prototype
To test out the design, we make a prototype boat directly from the plug. Since the composite materials are laid on the surface of the plug, the outside surface of the plug will have the texture of the fabric used rather than the smooth finish of the final boats. The prototype is made in two halves and seamed together like the final boats.

7. Test the prototype!
The fun bit! We try to paddle the prototype in a variety of different situations; waves, holes, on rivers and on the sea. And we value the opinions of other paddlers who help us test the design.
8. Modify the design
Using the results of the testing, we often find ways to improve on the design, maybe altering the rocker, or lifting a seamline, or adding some volume. We either modify the plug and make another prototype, or we alter the existing prototype to see if the change works out better or not. We generally go through many cycles of modifications until we are happy with the design.
9. Make the moulds
Once we have made a decision on the final design, we update the plug with any changes that we tried out on the prototype. We then make moulds from the plug. This is similar to making a prototype in two halves, except that the moulds are much thicker as they have to be very rigid. The exact shape of the plug is reproduced on the inside surface of the moulds.
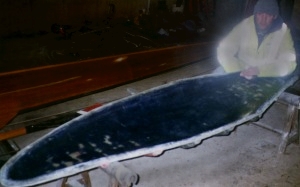
10. Sand and polish the moulds
The inside surface of the moulds must be of the highest quality to ensure that boats release cleanly, and with a good surface finish. Therefore the moulds are sanded with fine emery paper, and polished to a high gloss. Once this is done, the moulds are ready to be used to make boats!
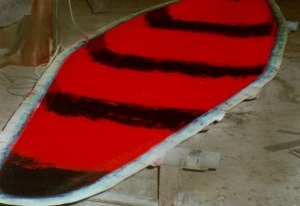
11. Gelcoat
If the boat is to be coloured, a layer of pigmented resin (or gelcoat) is the first layer to be put into the mould. This can be one plain colour, or an elaborate design. Since there is no reinforcement fibre added to the gelcoat, it contributes very little to the strength of the boat. If a 'natural fibre' finish is desired this step is omitted.
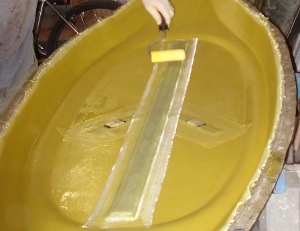
12. Layup composite material layers
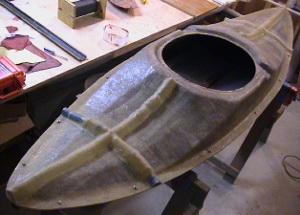
To make the load-bearing layers, sheets of various woven reinforcement fabrics are placed inside the mould and thoroughly wetted out with a suitable resin. It is important to eliminate any air bubbles in the resin that may become trapped between the flabric layers. Once the desired thickness has been reached, strap points, etc are added and the resin is allowed to set. The boat is left in the mould for a further period to cure, to maximise stiffness.

13. Release and finish
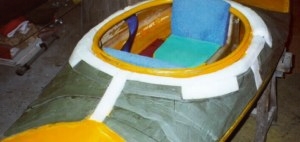
After the two halves of the boat have been allowed to cure, they are released from the moulds, trimmed if necassary to reduce the volume of the final boat, and joined together. This is done using two strips (or seams) of kevlar tape saturated in resin, one inside and one outside around the join. Once this is done, and pillars, seat and padding installed, the boat is ready to be paddled!

14. Finished Boat
Paddle and enjoy!
